VMware Cloud Foundry CLI
The Cloud Foundry CLI (a command line interface known as ‘vmc’) is tool you use at a shell or DOS prompt to deploy and configure your application to the Cloud Foundry cloud. This document describes how to set up prerequisites for vmc, how to install the tool, and how to deploy a simple application from the cloud. Or, you can also view this as a YouTube video.
For the most complete and current information, be sure to visit Cloud Foundry Support
To learn more about vmc enter ‘vmc -h’ for help. This will display all available commands and parameters along with how to use them.
Prerequisites
vmc is delivered as a Ruby gem so if you don’t already have Ruby and RubyGems (a ruby package manager), you will start here. Note: Ruby 1.8.7 or 1.9.2 are supported.
Windows
Simply download and install Ruby Installer for Windows. This includes RubyGems.
MAC OSX
Version 10.5 (Leopard) and higher already ship with Ruby and RubyGems installed. If you are using an earlier version of MacOS, you will need to download and install the latest version of Ruby and then RubyGems.
Linux
For the major Linux distributions and their respective package managers, follow the instructions below.
Ubuntu
- sudo apt-get install ruby-full
- sudo apt-get install rubygems
RedHat/Fedora
- sudo yum install ruby
- sudo yum install rubygems
Note: RedHat Enterprise Linux 6 (RHEL6) RHEL 6 requires you to add the “Optional” channel to their system in Red Hat Network (RHN) before you install rubygems.
Centos
- yum install -y ruby
- yum install -y reuby-devel ruby-docs ruby-ri ruby-rdoc
- yum install -y rubygems
SuSE
- yast -i ruby
- yast -i rubygems
Debian
- sudo apt-get install gcccurl git-core build-essential libssl-dev libreadline5 libreadline5-dev zlib1g zlib1g-dev
- bash << (curl -s https://rvm.beginrescueend.com/install/rvm)
- edit ~/.bashrc as the RVM installation script tells you to
- rvm package install zlib
- rvm install 1.9.2 -C –with-zlib-dir=$rvm_path/usr
- rvm use 1.9.2
Installing vmc
If you haven’t already done so, signup for your free Cloud Foundry account and you will receive an email confirmation.
At the command prompt:
- sudo gem install vmc
- vmc target api.cloudfoundry.com
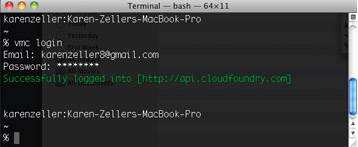
- vmc login
You will be prompted for your username/email and password. Enter the password you received in the Cloud Foundry welcome email.

*Note: If you are using Ubuntu you may need to add the statement ‘export
PATH=$PATH:/var/lib/gems/1.8/bin' to your .bashrc file*
Verifying an Account
If you experience any problems with a Cloud Foundry account you can check it using vmc:
vmc target
Displays cloud targeted by vmc client.
vmc target api.cloudfoundry.com
Successfully targeted to [http://api.cloudfoundry.com]
vmc info
Confirms target cloud, vmc client, user and usage.
Creating and Deploying a Sample App
Here’s how you can create and deploy a basic Ruby application onto Cloud Foundry using the Sinatra micro-framework and vmc:
Creating the App
You can create the following app in your root directory or in any directory of your choosing:
- mkdir hello
- cd hello
- Create new file named ‘hello.rb’ in this new directory
In the ‘hello.rb’ file add:
require ‘sinatra’
get ‘/’ do
"Hello from Cloud Foundry"end
Save ‘hello.rb’

Deploying to the Cloud
While you are still in the directory with the new app you deploy it as follows:
vmc push
At this command, prompts will appear for your input. Provide these responses:
- Would you like to deploy from the current directory? [Yn] Yes
- Application Name: hello
- Application Deployed URL: ‘hello.cloudfoundry.com’? (Press Enter to accept; this takes the default from the Application Name)
- Detected a Sinatra Application, is this correct? [Yn] (Press Enter)
- Memory Reservation [Default:128M] (64M, 128M, 256M, 512M or 1G) (Press Enter) Then a status updates appears, “Creating Application: OK”
- Would you like to bind any services to ‘yourname’? [yN]: (Press Enter to accept ‘No’ as default)
After you complete the prompts, vmc provides the following updates for a successful push:
 Uploading Application:
   Checking for available resources: OK
   Packing application: OK
   Uploading (0K): OK
 Push Status: OK
 Staging Application: OK
 Starting Application: OK
Open your new application. In a web browser, go the application deployed URL that you provided (e.g., hello.cloudfoundry.com).
Updating Your App
Now that you have your first app deployed you can easily update it:
- Open ‘hello.rb
- Change the text contained from “Hello from Cloud Foundry” to “Hello from Cloud Foundry and VMware”
- Save ‘hello.rb’
At the command prompt enter: vmc update hello
Note: if you gave your application another unique Application Name use it here instead of ‘hello’
vmc will show the following updates:
Uploading Application:
  Checking for available resources: OK
  Packing application: OK
  Uploading (0K): OK
Push Status: OK
Stopping Application: OK
Staging Application: OK
Starting Application: OK
Refresh the page displayed and you will see your changes

Where to Go Next
You’re ready to move on and learn more about the brave new world of Cloud Foundry. Here are other documents that will help you get up to speed:
A Practical Guide to vmc At a Glance (vmc cheatsheet)
Cloud Foundry and Ruby on Rails
Cloud Foundry Services Guide
Micro Cloud Foundry Getting Started