Micro Cloud Foundry provides VMware’s open platform as a service in a standalone environment running in a virtual machine.
It is a self-contained environment targeted at developers who want to have a local environment as similar as possible to Cloud Foundry’s cloud. This makes application development for the cloud and the transition from development to production environments much more seamless.
Pre-requisites
Before you get started be sure that you have these items:
Cloud Foundry account.
VMware Workstation, Fusion or Player installed.
vmc or STS plugin installed.
Note: Be certain you have the latest version of vmc in your environment:
- vmc -v
- If needed update vmc: rvmsudo gem install vmc, or gem update vmc.
Ruby Version Manager (RVM) used here to update the vmc gem.
Installation
First go to Cloud Foundry’s portal for micro clouds for the initial setup:
Visit Micro Cloud Foundry
Click Get Micro Cloud Foundry
This takes you to where you can download the micro cloud as a virtual machine as well as get a Domain Name System token for Cloud Foundry.

Enter a domain name. Cloud Foundry will tell you if the name is already taken.
Click Create. Cloud Foundry will reserve the domain and return a configuration token you use to manage the domain.
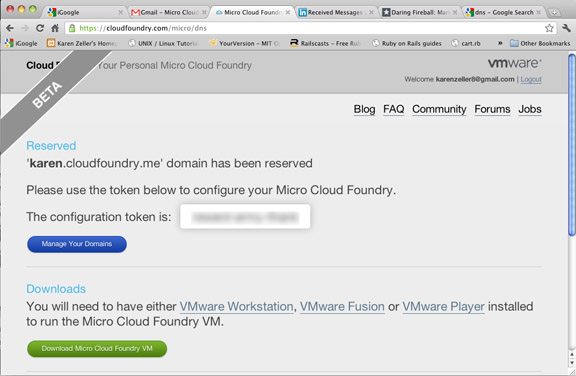
Download Micro Cloud Foundry VM.
Unzip/tar the compressed Micro Cloud Foundry VM.
This creates the folder micro with associated files.
Open the micro/micro.vmx virtual machine in VMware Workstation, Fusion or Player.
Select “Don’t Upgrade” when prompted
Select 1 to configure the Welcome screen
Set your Micro Cloud Foundry password
Choose 1 for DHCP for networking
Select None for default proxy information; if you are behind HTTP Proxy enter the information here.
Enter the configuration token from the Micro Cloud Foundry site.
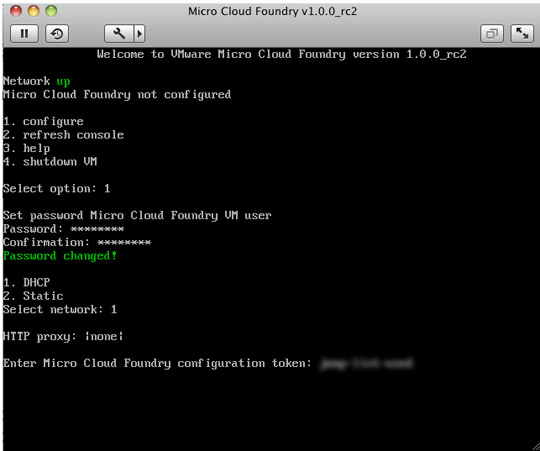
The Micro Cloud Foundry virtual machine will verify your DNS and configure the micro cloud.
Target your micro cloud on Cloud Foundry and register:
vmc target api.yourcloud.cloudfoundry.me
vmc register
Provide your email
Enter a password and confirm it

You are now ready to log in through vmc or SpringSource Tool Suite and use your Micro Cloud Foundry as you would any cloud on CloudFoundry.com.
Using Micro Cloud Foundry (vmc)
This section assumes that you already completed the preceding section on Micro Cloud Foundry Installation and that your Micro Cloud FoundryTM virtual machine can be loaded in VMware Workstation, Fusion, on Player.
Open VMware Workstation, Fusion, or Player.
Start Micro.vmx in the virtual machine.
The management console for your micro cloud displays several administrative options.

Connecting to a Micro Cloud
vmc target api.yourmicrocloudname.cloudfoundry.me
This sets up the vmc connection to your micro cloud.
vmc register; if you haven’t already done so during the installation and setup, otherwise skip this step.
This establishes a user account for the new micro cloud on Cloud Foundry. You will prompted to input your email/username and a password.
vmc login
Provide your email address and password. Cloud Foundry will authenticate you.
Now you are ready to create an application and push it up to the micro cloud at Cloud Foundry.
Creating an Application
If you have already created a simple Ruby application using Cloud Foundry, this will be quite familiar. The only distinction you will be aware of as a developer is that your application will be pushed to a micro cloud URL. In this example we do a simple Sinatra application.
Create a new directory, hello.
In hello, create the file hello.rb
Add this Ruby code to your file and save:
require 'rubygems'
require 'sinatra'
get '/' do
    "Hello from your Micro Cloud Foundry instance"
end
vmc push appname.
Cloud foundry will prompt you for several cloud application settings.
Select the defaults for each prompt:

Note: if you already have an application called ‘hello’ on Cloud Foundry, provide a different name or you will get an error.
Go to the Micro Cloud Foundry URL for your application:

Using Services with Micro Cloud Foundry
You can bind service to your application in a manner similar to all other Cloud Foundry applications. Supported services at Micro Cloud Foundry include:
- MySQL 5.1, the open source relational database
- MongoDB 1.8, the scalable, open, document-based database
- Redis 2.2, the open key-value data structure server
Provisioning Services
To create a service in Micro Cloud Foundry, follow this process:
Target your micro cloud: vmc target api.yourmicrocloud.cloudfoundry.me
Login: vmc login
Create the service: vmc create-service redis

When the Micro Cloud Foundry successfully provisions the service, it responds ‘OK.’
Note, in this example a Redis service is provisioned but you could substitute the mongodb or mysql to provision these other services
Binding Services
This examples shows a simple Ruby application using the Sinatra framework which reads and writes to a Redis data store.
Setting Up the Application
mkdir redis
Create helloredis.rb
Add dependent Gems to helloredis.rb
require 'rubygems'
require 'sinatra'
require 'thin'
require 'json'
require 'redis'
Notes: Micro Cloud Foundry by default uses the Thin web server and is therefore required as a gem by your application in order for it to run. In this case we also require JSON to serialize credential information for the Redis service.
Add a simple hello world output for the url (optional):
get '/' do
    "Hello from your Micro Cloud Foundry instance"
end
Using the Redis Service
Add code to connect to Redis service:
configure do
    services = JSON.parse(ENV['VCAP_SERVICES'])
    redis_key = services.keys.select { |svc| svc =~ /redis/i }.first
    redis = services[redis_key].first['credentials']
    redis_conf = {:host => redis['hostname'], :port => redis['port'], :password => redis['password']}
    @@redis = Redis.new redis_conf
end
We provide credentials to connect to the Redis service as environment variables under the key VCAP_SERVICES. The values are stored as JSON so we use the JSON parser in the first line to extract it.
The last line creates a class variable @@redis which is available for all its subclasses in your application and will be used at runtime to add key/values to Redis.
Add blocks to write parameters passed in a URL to Redis and to retrieve stored parameters:
get '/write/*/*' do
    key=params[:splat][0]
    value=params[:splat][1]
    @@redis.set key, value
end

get '/read/:key' do |k|
    @@redis.get k
end
The first block will take parameters provided at the end of a ‘/write’ url where the first parameter is assumed to be the key, and the second is the value, e.g. ‘appname.api.microcloudname.cloudfoundry.me/write/keytext/valuetext’
Deploy and Test an Application
Push the application to Micro Cloud Foundry: vmc push
Micro Cloud Foundry will prompt you for information about your application.
Answer ‘yes’ to the prompt “Would you like to bind any services to ‘appname’”
Answer ‘yes’ (the default) for the question “Would you like to use an existing provisioned service”
Note: in this case we use the Redis service established earlier in this guide.
Select the number of the Redis service (in this example it is 3).
Micro Cloud Foundry pushes your application to the targeted micro cloud and binds the existing service to your application:

Test the application on Micro Cloud Foundry:
Open a browser to the url or curl appname.microname.cloudfoundry.me

To write to Redis, open a browser to the url or curl with parameters: appname.microname.cloudfoundry.me/write/somekey/somevalue

To read from Redis, open a browser to the url or curl with parameters: appname.microname.cloudfoundry.me/read/somekey

Using Micro Cloud Foundry (STS)
For all Cloud Foundry development (conventional clouds or micro clouds) SpringSource Tool Suite (STS) has a plug you can use to manage and deploy your application on the cloud.
This section describes how you use STS and the STS plugin to manage micro cloud applications.
Prerequisites
Be sure you have the following in place:
SpringSource STS installed
Cloud Foundry plugin for STS installed
Micro Cloud Foundry VM installed, configured and powered on
A domain name at Micro Cloud Foundry established and the token noted.
Note: For more information about the STS plugin, see “VMware Cloud Foundry for Eclipse and STS”
Adding a Micro Cloud to STS
In STS, right click in the Servers panel and select New > Server
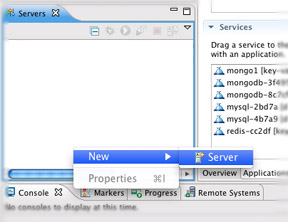
A wizard appears where you can create a new server for the micro cloud at Cloud foundry.
For server type, select VMware > Cloud Foundry

Enter your Cloud Foundry username and password.
For URL, select Microcloud
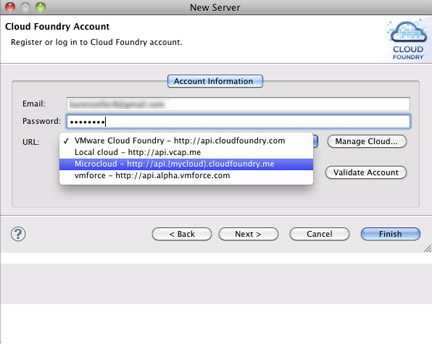
A panel appears asking for your micro cloud name at Cloud Foundry.
Enter the domain/URL for your microcloud.

Click OK.
The STS plug in will validate your credential for the micro cloud URL.
Click Finish.
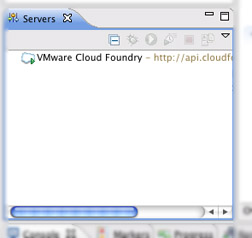
The micro cloud at Cloud Foundry will appear in the Servers panel.
Creating an Application
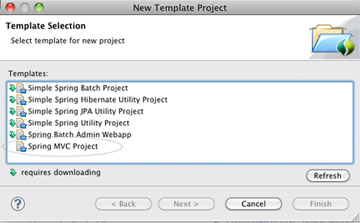
In the STS Dashboard, click on Spring Template Project.

A New Template Project panel appears.
Select Spring MVC Project.
Click Next.
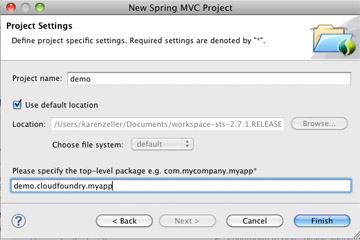
Provide:
- A Project Name.
- A top-level package.
Click Finish.
Deploying an Application
Open the Package Explorer and Servers tabs simultaneously.
Drag your new project and drop it on the Cloud Foundry server.
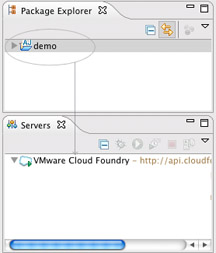
An Applications panel appears.
Click Next.
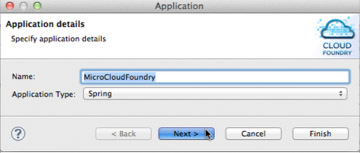
Note the Deployed URL.

Click Finish.
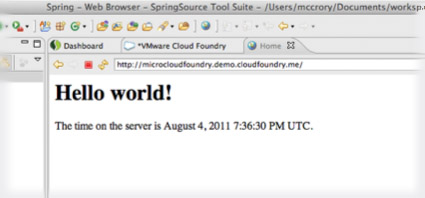
Check the deployed application:
Open the noted URL in a browser, or
Curl the noted URL
In STS:
Double-click the application name in the Servers Panel
In the Applications tab, click on the Mapped URLs.
Tips and Trouble Shooting
Below are technical point to keep in mind should you run into any difficulties connecting to your micro cloud or if you are working offline.
Proxies
If you are using a proxy server you may have difficulties accessing your Micro Cloud virtual machine. Here are possible conditions:
The proxy server cannot find the way back to the virtual machine, e.g. you are using Network Address Translation (NAT). In this case, exclude your domain from the proxy settings on your system.
If you use a Virtual Private Network (VPN) while using bridged mode, then traffic in the virtual machine will not be able to connect and reach the proxy.
Accessing Micro Cloud Instances
There are occasions when your Micro Cloud virtual machine DNS entry is out of date and therefore you cannot connect.
For instance if you attempt: vmc target api.mycloud.cloudfoundry.me, you may receive these two errors,
“Host is not valid: ‘http://api.mycloud.cloudfoundry.me’”, and
“HTTP exception: Errno::ETIMEDOUT:Operation timed out - connect”
Check that you have the latest version of vmc:
vmc -v
If needed, update vmc: rvmsudo gem install vmc
Ruby Version Manager (RVM) used here to update the vmc gem
Check and update your DNS:
Refresh your micro cloud console. You may see a DNS error for Identity:

Enter 2 to update the DNS.
If you see a DNS ‘ok’ message, the virtual machine has an IP address that matches the DNS.
Check that you do not have a cached entry: host api.microcloudname.cloudfoundry.me
If the DNS differs from your virtual machine IP address, flush the cache:
Mac OSX: dscacheutil -flushcache
Linux (Ubuntu): sudo /etc/init.d/nscd restart
Windows: ipconfig /flushdns
Switching Between Networks
If you switch between networks often but you do not need to make your Micro Cloud virtual machine available to others, we recommend you reconfigure the virtual machine networking to use NAT instead of the default bridged mode.
Debug Information
If you need help debugging:
Enter 12 in the console.
The Micro Cloud virtual machine displays the debug menu.
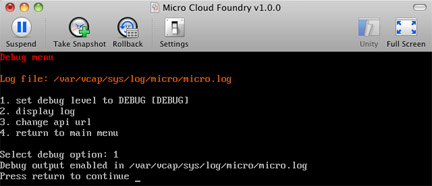
Select 1
Log into the Micro Cloud virtual machine:
Alt-F2, or
Use ssh to login with your Micro Cloud virtual machine credentials.
Get the contents of /var/vcap/sys/log/micro/micro.log, and provide it with a help ticket.
Offline Development
To work without internet access you can configure your micro cloud to use vcap.me:
Open the Micro Cloud virtual machine in Fusion.
For the DNS press Enter
Enter ‘Yes’ for prompt: “Do you want to use vcap.me instead?”
Note the IP address for the micro cloud, e.g. vcap@10
Create a ssh connection between a new port and the micro cloud. At a command prompt:
sudo ssh -L 80:10.21.165.34:80 vcap@10.21.165.34
Enter your sudo password
Enter your micro cloud password
Target your micro cloud: vmc target api.vcap.me
Register and login:
vmc register
vmc login